Gmail is a service that needs no introduction. Over the past 15 years, Google’s free email platform has become an important part of our lives, dethroning Hotmail (and now Outlook) to become the reference in the sector. Like us, you’re probably enjoying the advantages of having a Gmail account and are probably confident that you know it like the back of your hand… but are you really aware of all the things it can do?
In today’s article, we’re going to share a list of tips and tricks to make the most of your Gmail account. As you’ll discover, there’s a lot more to using your email than checking your inbox every morning and sending messages to your friends and family. We hope you find it helpful

1. Undo send
One of Gmail’s most interesting and useful options is the possibility of cancelling an email you’ve sent by accident, perhaps by inadvertently hitting “Send” before you were ready. And let’s be honest, who hasn’t had the experience of firing off an email and immediately regretting it? Fortunately, using this little trick, the recipient will never read your message. Want to know how to do it?
Gmail gives you the option of unsending an email you’ve sent, but it only works for a certain period of time. The interval ranges from five to a total of 30 seconds from the moment you hit “Send.”

To set a time limit for unsending messages, you need to access your email settings (click the gear icon in the upper right corner of your screen). In that window, then go to the “General” tab and look for the “Undo send” section. Gmail’s default setting is five seconds to undo send, but you have the option of extending that time to 30 seconds.
Once this time is set, whenever you send an email, you’ll see a little message at the bottom of the screen informing you that your message has been sent, along with the Undo button. If you click it, your email won’t reach your recipient, and it will reopen for you to continue editing it.
2. Set up an out-of-office reply
Who doesn’t like to disconnect from the daily grind and especially the internet when they go on vacation? However, upon your return, you’re likely to be hit by an avalanche of emails, including some important ones you need to answer. For these situations, it’s useful to know how to turn on Gmail’s out-of-office reply.
First, go to the Settings menu (click the gear-shaped icon in the upper right corner).
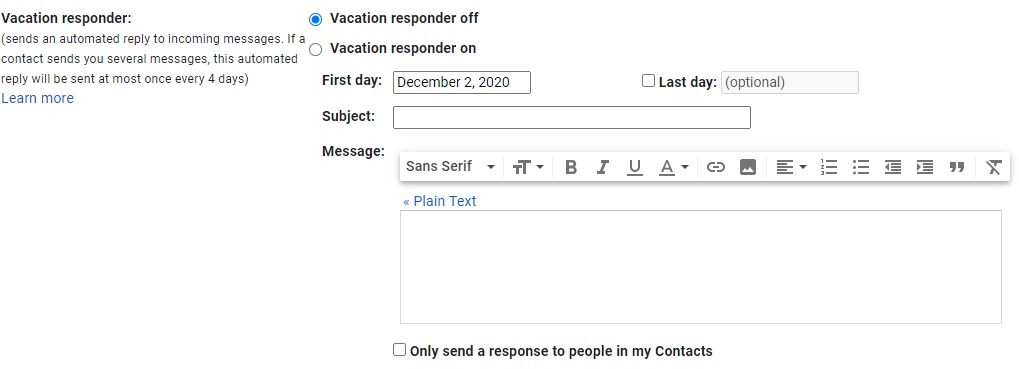
Under the “General” tab, look for the “Vacation Responder” option and click the “Vacation responder on” button. Next you need to set the first day and the last day for your out-of-office reply to be sent. Finally, just write the subject line and body of your email.
If for some reason you decide to disable the vacation responder, just follow the above steps and select “Vacation responder off.”
3. Synchronize various email accounts in Gmail
Gmail lets you synchronize more than one email address under the same account. Best of all, in addition to other Google accounts, you can import accounts from other servers, such as Outlook or Hotmail, and thus have all your emails centralized.
To synchronize several email accounts on Gmail, first you need to set them up. Although the process may seem complicated or tedious at first, it’s not so bad once you get the hang of it. First open your Gmail settings (the gear icon) and click “Settings.”
In this new window, click the “Accounts and Import” tab, and under “Check mail from other accounts” click “Add a mail account.” Enter your account information, and from now on, all your emails will reach your Gmail inbox.
If you want to reply directly to your emails from Gmail, you need to set this up as well. Go back to “Accounts and Import,” find the “Send mail as” section and click “Add another email address.” Set up the email address you want to import, and in the window to compose an email, you’ll have option of choosing which account you want to send it from.
4. Organize your messages by priority
Most people receive a huge amount of emails every day, which can make it hard to spot messages that are truly important. To make this task easier, Gmail has a star icon you can use to mark important messages and make them stand out from the rest.
Using this feature is really simple: just click the star that appears next to the email in question. But you’ll probably need more than a single star to organize your emails according to their importance. Fortunately there’s a very simple way to do this.
To set up priority icons in your inbox, go to the Gmail Settings menu. There, click the “General” tab and look for the “Stars” section. By default Gmail will only display the yellow star, but you have the option of adding other icons to highlight emails.

If you want to add new stars or icons to Gmail, just drag that icon from the “Not in use” to the “In use” section. Then, be sure to click the “Save Changes” button. Now you can add new icons to your messages by clicking successively on the star.
5. Organize your messages using labels
If the star system isn’t enough for you, Gmail lets you add labels to email groups to organize and classify your inbox in a much more visual way.
To use Gmail labels, first open the Settings menu of your email by clicking the gear icon. In the new window, click the “Labels” tab.
![]()
The process to create labels on Gmail is quite intuitive. First you’ll see the system labels created by the service itself, the default categories and finally the labels generated by users. If you want to create a new label, simply click the “Create new label” button and fill in the fields requested by Gmail.
Creating labels is truly useful because it lets you group several emails under the same category, with an icon in the color of your choice, which makes it easier to not only find emails but also to check your inbox at a glance. If you need more help with creating labels on Gmail, don’t worry. In the guide below, we’ll walk you through all the steps to do this.

How to stop Gmail spam forever
READ MORE6. Customize your inbox
Without a doubt, your inbox is the most important part of your Gmail account, and also the one you use the most frequently. There you can check for new emails, reply to them or delete them. Although Gmail has greatly evolved since its inception and currently offers a more streamlined inbox, some users may still find it confusing. That’s why we strongly suggest customizing it.
 To choose the tabs you want to see in your inbox, click the “Settings” icon followed by “Inbox.” This will open a new window where you can choose which tabs to show in your inbox (Primary, Social, Promotions, Updates and Forums). That way they won’t all appear in your “Primary” inbox.
7. Create and add filters
One interesting way to have absolute control over your emails is to add filters to your incoming messages. These filters are capable of automatically performing actions when certain emails reach your inbox (for example, deleting messages from certain senders, adding labels, archiving emails with attachments of a certain size, etc.).
To manage and create filters on Gmail, first open the Settings menu of your email. From there, click the “Filters and Blocked Addresses” label. In this new window you’ll have an overview of all the filters currently linked to your email address.

To add a new filter, go to the end of the list and click “Create a new filter.” There you can specify whether your filter should be associated with the recipient, email content or size, whether the message has an attachment, chats, etc. Then click “Create filter” and decide what steps Gmail should take when you receive an email that meets your chosen specifications. Then just click the blue “Create filter” button. It’s that easy!
8. Block other users
Gmail is capable of sending any email it considers suspicious or potentially fraudulent straight to your spam box. However, there are times when you may receive emails from people you find a lot more irritating than spam, and you’d like to delete them from your inbox. In these situations, the most practical thing to do is to block the sender, but… do you know how to do that?

Blocking a user on Gmail is quite easy. Simply find an email you received from that persona non-grata, open it and click the icon with the three vertical dots that appears next to the “Reply” icon. This will open a drop-down menu where you only need to click the “Block…” button.
Alternatively you can block someone’s emails by creating a filter for them. To find out how Gmail filters work, see point 7.
9. Create a task list
Are you the kind of person who needs to respond to hundreds of emails every day and ends up forgetting about half of them? Don’t worry, you’re not the only one, and Gmail knows perfectly well that this is a common problem. That’s why the email service offers the option of creating a task list so you’ll always know which emails you should reply to throughout the day
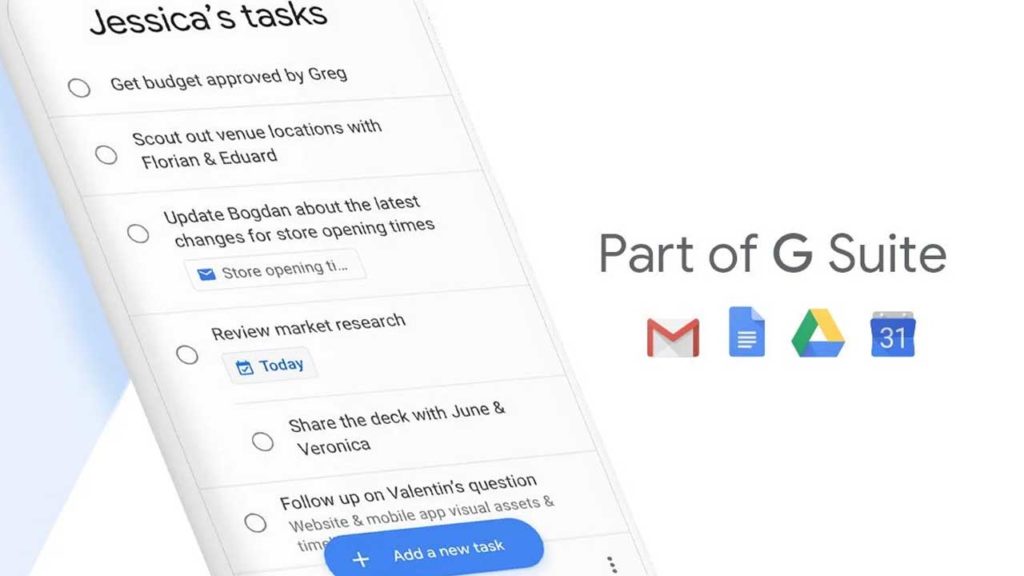
To create a task list on Gmail, simply select the email in question (without opening the email) and click “Add to tasks” at the top of your inbox.
 Then you’ll see a floating window with all of your pending tasks. As you complete them, you can check them off so they disappear from the screen. That way you’ll never forget to reply to an important email during your workday.
Tips to personalize your Gmail account
READ MORE10. Change your Gmail theme
If you like to customize your PC down to the last detail, you’d probably love to change the appearance of your Gmail inbox. To do so, just click Settings (the gear icon) and select “Themes.”
Then Gmail will show you a wide variety of beautiful images to change the appearance of your Gmail interface. If you’re not crazy about any of them, don’t worry, because you can also use any image you want by clicking on the “My photos” option.

After choosing your background image for Gmail, you can also change the background color of the service and add a variety of effects to beautify your inbox. This is ideal for anyone who spends long hours using their email for work and enjoys adding a personal touch to all of their things.
11. See all of your email logins
Your email contains lots of personal data and secrets that you wouldn’t want anyone else to find out. That’s why email accounts are frequently targeted by hackers, identity thieves, and even jealous partners who are dying to comb through your personal email.
If you suspect that someone else has logged into your Gmail account without your permission but don’t know how to check, we recommend reviewing your email access history. The process is really easy and only takes a few seconds.
First, open your Gmail inbox and go to the bottom of the page. In the lower right corner, you’ll see “Last account activity” and beside it, how many minutes or hours ago your email was last accessed. Then click “Details.”

Then a window will open with all the logins to your account listed by access type and by IP address. If you see any suspicious activity, we recommend clicking the button marked “Sign out all other sessions,” changing your email password, and informing Google of this unauthorized access.
12. Have chats and videoconferences and make calls using Hangouts
If you’re a Hangouts user, you’ll be happy to know that you can chat, make calls and have videoconferences from your Gmail inbox. The control panel can be found in the lower left corner of your screen so… what are you waiting for to talk to your friends?
13. Back up your email
Although you’re probably used to having your email stored in the cloud, it’s nice to have a backup on your computer in case of an emergency.
Google offers a simple method to export a copy of your email (in addition to the rest of your data in the company’s possession) and save it on your PC. To do this, go to the “Create a new export” option in your Google account (click here to do that) and make sure to check the “Mail” option.
14. Share your email account with another person
For work or personal reasons, you may find yourself in a situation where you need to give another person access to your email account but you don’t want to share your password with them. Gmail has a simple method to give someone access to your account so they can reply reply to emails on your behalf without being able to change your settings or password, for example.
To grant temporary access to your email to another person, just go to Gmail Settings and click the “Accounts and Import” tab. In the “Grant access to your account” tab, click the “Add other account” button and specify that person’s email address.

As we explained, this will allow the person to access your inbox and reply to messages for you, but they can never steal your account, because all of the settings and password options will be blocked.
If you want to learn more about this option on Gmail, check out the article below.

The Best Alternatives to Gmail
READ MORE15. Send confidential messages
If you frequently send messages or attachments with sensitive or confidential data, you’ll be pleased to learn that Gmail has added the option of sending private and highly confidential messages. These emails have an expiration date (that is, they disappear after the date you select), and they cannot be copied, forwarded or printed. The same goes for their attachments. Moreover, to open these messages, the recipients will need a passcode generated by Google.

To send a confidential email, first compose your message and add your attachments as usual. Next, click the “Turn confidential mode on/off” button at the bottom of the screen (just to the right of “Insert photo“). Then set up your confidentiality settings and save the changes. Your message is ready to be sent!
16. Insert files from Google Drive
Google Drive is seamlessly integrated with Gmail, so you can add attachments from this cloud storage service right in your email.
![]()
To add a file from Drive to your email, simply compose your message as usual and then click the Google Drive icon at the bottom of the screen. A new window will then open where you can choose your desired file from your cloud storage account and add it to your email.
17. Use keyboard shortcuts
Many people are unaware of the fact that Gmail has a large assortment of keyboard shortcuts you can find by pressing Shift + ?. They are really useful if you use your email every day and want to boost your productivity a bit.
Gmail has two types of keyboard shortcuts, the kind that are always enabled, and they kind you need to activate using the shortcuts menu (Shift + ? key and then the option “Enable”).

You can find all of them below:
Keyboard shortcuts that are always enabled:
Compose and chat:
- <Shift> + Esc : Focus main window.
- <Esc> : Focus latest chat or compose
- <Ctrl> + . : Advance to next chat or compose.
- <Ctrl> + , : Advance to previous chat or compose.
- <Ctrl> + <Enter> : Send.
- <Ctrl> + <Shift> + c : Add Cc recipients.
- <Ctrl> + <Shift> + b : Add Bcc recipients.
- <Ctrl> + <Shift> + f : Access custom from.
- <Ctrl> + k : Insert a link.
- <Ctrl> + ; : Go to previous misspelled word.
- <Ctrl> + ‘ : Go to next misspelled word.
- <Ctrl>+ m : Open spelling suggestions.
Formatting:
- <Ctrl>+ z: Undo.
- <Ctrl> + y: Redo.
- <Ctrl> +< Shift> + 5 : Previous font.
- <Ctrl> + <Shift> + 6 : Next font.
- <Ctrl> + <Shift>+ – : Decrease text size.
- <Ctrl> + <Shift> + + : Increase text size.
- <Ctrl> + b : Bold.
- <Ctrl> + i : Italics.
- <Ctrl> + u : Underline.
- <Ctrl> + <Shift + 7 : Numbered list.
- <Ctrl> + <Shift + 8 : Bulleted list.
- <Ctrl> + Shift + 9 : Quote.
- <Ctrl> + [ : Indent less.
- <Ctrl> + ] : Indent more.
- <Ctrl> + <Shift> + l : Align left.
- <Ctrl> +<Shift> + e : Align center.
- <Ctrl> + <Shift> + r : Align right.
- <Ctrl> + <Shift> + , : Set right-to-left.
- <Ctrl> + <Shift> + . : Set left-to-right.
- <Ctrl> + \ : Remove formatting.
Keyboard shortcuts you need to enable from the Shift + ? menu:
Jumping:
- g then i : Go to Inbox.
- g then s : Go to Starred conversations.
- g then t : Go to Sent messages.
- g then d : Go to Drafts.
- g then a : Go to All mail.
- g then c : Go to Contacts.
- g then k : Go to Tasks.
- g then l : Go to Label.
Threadlist selection:
- * y then a : Select all conversations.
- * y then n : Deselect all conversations.
- * y then r : Select read conversations.
- * y then u : Select unread conversations.
- * y then s : Select starred conversations.
- * y then t : Select unstarred conversations.
Navigation:
- u : Back to threadlist.
- k / j : Newer/older conversation.
- o o <Enter> : Open conversation; collapse/expand conversation.
- p / n : Read previous/next message.
- g then n: Go to next page.
- g then p: Go to previous page.
- ` : Go to next inbox section.
- ~ : Go to previous inbox section.
Application:
- c : Compose.
- d : Compose in a tab.
- / : Search mail.
- q : Search chat contacts.
- . : Open “more actions” menu.
- v : Open “move to” menu.
- l : Open “label as” menu.
- ? : Open keyboard shortcut help.
Actions:
- , : Move focus to toolbar.
- x : Select conversation.
- s : Toggle star/Rotate among superstars.
- y : Remove label.
- e : Archive.
- m : Mute conversation.
- ! : Report as spam.
- # : Delete.
- r : Reply.
- <Shift> + r : Reply in a new window.
- a : Reply all.
- <Shift> + a : Reply all in a new window.
- f : Forward.
- <Shif>t + f : Forward in a new window.
- <Shift> + n : Update conversation.
- ] / [ : Remove conversation from current view and go previous/next.
- } / { : Archive conversation and go previous/next.
- z : Undo last action.
- <Shift> + i : Mark as read.
- <Shift> + u : Mark as unread.
- _ : Mark unread from the selected message.
- + o = : Mark as important.
- – : Mark as not important.
- ; : Expand entire conversation.
- : : Collapse entire conversation.
- <Shift> + t : Add conversation to Tasks.
Hangouts:
- h then m : Show menu.
- h then a : Show Archived Hangouts.
- h then i : Show Hangout requests.
- h then c : Focus on the Conversation list.
- h then p : Open phone.
18. Schedule send
If you use Gmail for work, you probably have situations where you’d like to be able to schedule your emails to be sent and delivered on a specific day, or at a certain time. Until recently, that was only possible through extensions, and not everyone is crazy about those.
Fortunately, Gmail got with the program and now allows you to schedule your emails to be sent within the interface. Just open a window to compose your email and click the blue arrow button beside “Send.” Then a dropdown menu will open with the “Schedule send” option.
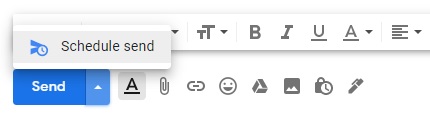
Then you can choose for your message to be sent at typical times during the workday for receiving email (8:00 AM and 1:00 PM) or select your own date and time to send your message.
19. Quickly find an email in your inbox
It’s happened to everyone at least once: you spend hours searching for a lost email in your Gmail inbox. When you receive tons of email every day, it’s easy to lose track of a single email you received several days earlier.
But there’s a quick way to find any email in Gmail: using its search operators. These are simple commands you can type in the “Search mail” bar to significantly reduce the number of messages in your results.
Below are the main search operators on Gmail.
- Specify the sender- from:sender’s_name
- Specify a recipient- to:recipient’s_name
- Specify a recipient who received a copy- cc:recipient’s_name
- Words in the subject line- subject:subject_text
- Messages that match multiple terms (for example, emails from two different senders)- from:sender_1’s_name OR from:sender_2’s_name
- Remove messages from your results- -word_to_avoid
- Messages that have a certain label- label:label_to_search
You can find a full list of Gmail search operators here.
20. Download and use Gmail add-ons
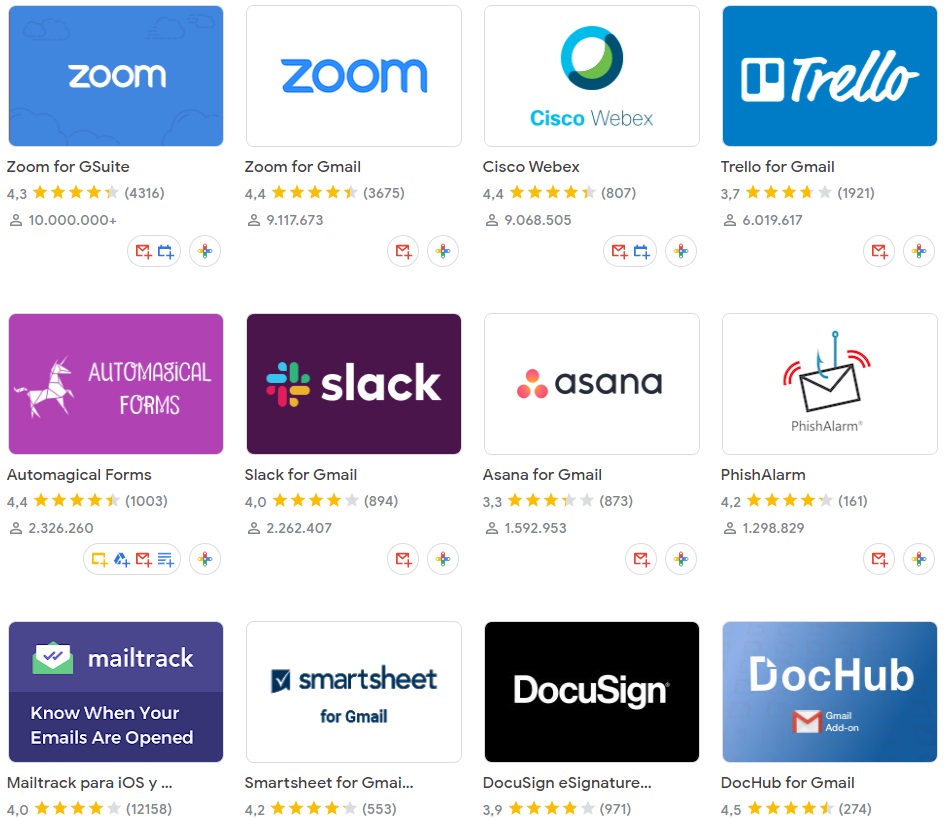
As Gmail is a service that can be used for both personal and work email, it offers a selection of add-ons that can help you to boost your productivity or stay connected to your coworkers. Among them are popular services like Zoom, Trello, Wrike, DocuSign and even Slack.

To access Gmail add-ons, first click “Download add-ons”. It’s the “+” sign that you’ll find in the right corner of the Gmail interface. Then a menu will open to display add-ons that are compatible with Google’s email interface. Click the one of your choice and it will be integrated with Gmail.
21. Personalize your signature
You might be used to typing your signature, especially if you use your email to communicate with your friends. However, if you use Gmail for business purposes, it’s more professional to have an automatic signature that appears at the end of all your messages.
To create a signature in Gmail, first click “Settings.” If you can’t find it, look for the gear-shaped icon in the top right corner of your screen. Next you’ll see a dropdown menu with quick settings. Select “See all settings.”
In the new window, under the “General” tab, look for the “Signature” option. Next just click the “Create new” button and generate a new signature, which will automatically appear at the bottom of all your email messages.
We hope you liked our guide on Gmail hacks to make the most out of your email account. Do you know of any other tricks and tips that we didn’t include on our list? Tell us about them in the comments section!